Xdebug, NetBeans and Vagrant
2015-05-06
Hi! In this short post I’ll describe the steps I’ve made, with the great help of a work colleague, on how to achieve the combination of these great tools together: NetBeans, Xdebug and Vagrant.
The following steps were executed in a vagrant box using Ubuntu, and with the Yosemite as the OS for the hosting machine.
Xdebug

Xdebug is one of the most amazing tools for any PHP developer.
Consider yourself in the following situation: you have your code base, developed under some framework, and you have some few bugs while developing new features. The most common attitude would be to add some echo calls to find out what exactly is happening in your code. Or even some var_dump to output the value of some variables.
Well that’s the most usual behaviour for many developers. But if you’ve started with any other language instead of PHP, you know how valuable is a proper debugger. That’s why xdebug was created: to bring the same functionality for PHP devs.

Vagrant

Vagrant is a tool to provide virtual environments for development, with different specifications from each other. It’s based on virtual machines inside your OS, and allow you to have flexible and portable environments.
For this post, I’ll consider that you already have an environment with Vagrant in your machine up and running.
Installing and Configuring Xdebug
First of all, you need to install Xdebug. From inside your vagrant box, execute the following command:
sudo apt-get install php5-xdebug
This will install the xdebug.so extension file inside of /usr/lib/php5/20121212/ path.
Once the command is complete, check with phpinfo()to find that the extension is correctly installed.
Then, we have to proceed to edit some basic configuration files:
- The
20-xdebug.inifile, which is a config file for Xdebug; - And the
php.ini, which is the basic config file for PHP.
You can find the 20-xdebug.ini file inside of these paths: /etc/php5/cli/conf.d/ and /etc/php5/fpm/conf.d/. If you can’t find these files, then create them inside of these paths.
For both 20-xdebug.ini files, add the following settings:
zend_extension=/usr/lib/php5/20121212/xdebug.so
xdebug.default_enable=1
xdebug.remote_enable=1
xdebug.remote_connect_back=on
xdebug.remote_port=9000
xdebug.remote_autostart=0
xdebug.remote_log=/tmp/php5-xdebug.log
xdebug.idekey=netbeans-xdebug
These are parameters for Xdebug to work properly. Remember that the netbeans-xdebug value is designed to follow NetBeans instructions.
Once the 20-xdebug.ini is created/updated, it’s time to add more settings for the php.ini files. You may find them in the /etc/php5/cli and /etc/php5/fpm paths. For these files, add the following parameters:
[xdebug]
zend_extension="/usr/lib/php5/20121212/xdebug.so"
xdebug.remote_enable=1
xdebug.remote_host=localhost
xdebug.max_nesting_level=1000
Now remember to restart the fpm and HTTP server services and you have the Xdebug installed successfully.
NetBeans Settings and Tips
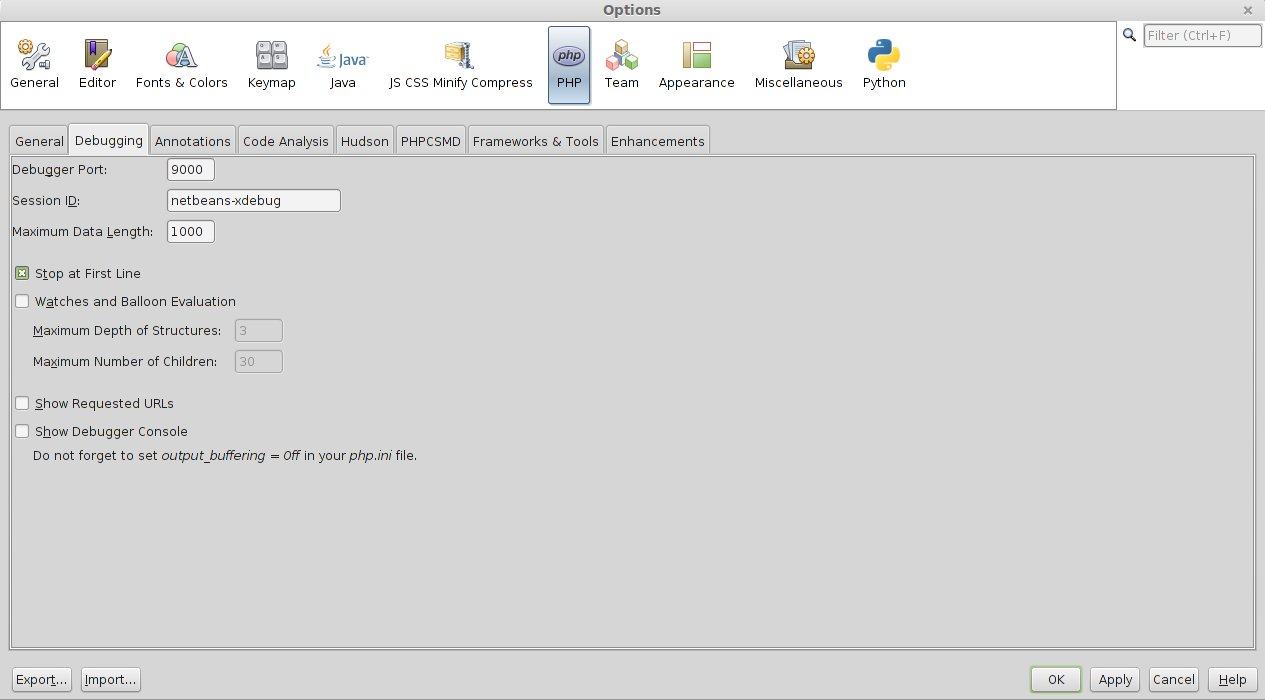
Now that you already have the Xdebug ready for action, it’s time to configure it for your IDE. Go to Options > PHP > Debugging and add the following settings, as the image below:

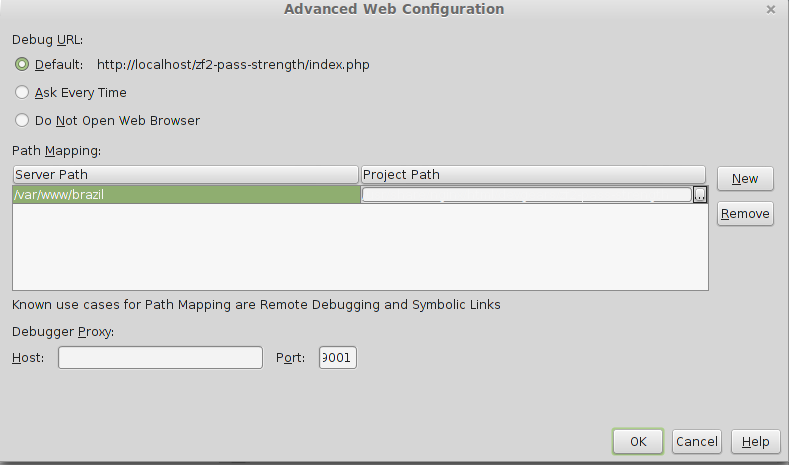
Then, in the Project > Properties > Run Configuration > Advanced, add the following settings:

The Server Pathn is the path inside your vagrant box where the project is located, and the Project Path is the path for your project outside of the vagrant box. NetBeans need this configuration in order to recognize where the project is. These settings should be made for each project.
Once all these steps are done, you can easily debug your PHP projects on NetBeans through your Vagrant boxes.
